Wednesday, March 30, 2011

What's Poppin' Up & Out Outside

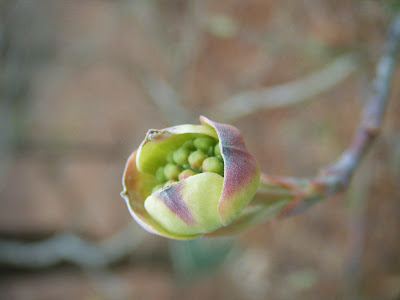
Every time I walk outside I see a new blossom or a new growth, then I say "there is going to be no more snow. There are to many plants and nature knows what's comin' up." When we had a couple hard snows, hard snow for us is anything over 6" of snow, everyone would mention how the almanac predicted a big blizzard in March. There are only a couple more days  of March left and no snow; but, there is lots of good rain. The rain has speed up blooming on a few plants, so nature does know what the weather will be. If she didn't then she wouldn't be exposing herself everywhere, thank goodness her cheeks are colorful and brightens these gloomy days. I would like to show you a few photos of the Dogwoods and Strawberries in bloom now.

Around here I grew up learning how the Dogwood represents Christ's nailing to a cross made of Dogwood, that was once a mighty tree and now is smaller because of the shame of bearing Christ's beaten body.


The four leaves represent the cross.


The blush color of Dogwoods is said to be the blood Christ shed for us at Calvary.

 ~~~~~

I can't wait to stain my fingers with red juice will making jam this season. The bloom on the left has already been fertilized and will soon form a berry, on the right the bloom is in need of a little honeybee companionship.


 Strawberries around our house don't make it to ripeness and being picked. The rabbits and other creatures love gobbling up the fruit.


~~~
Have a great weekend!


Monday, March 28, 2011

Everything, but the Kitchen Sink. So I'll Throw In the Bathroom Sink: Garden Edition

I love putting things together that do not naturally belong together. Decorations in my home consist of vintage coke bottles and Kerr jars as vases, plates as cake stands, and barn stars a-million. Outside there are headboards, a chair, a toilet, pots & pans, and even a bathroom sink. These objects may seem like my yard looks like a junkyard; but, the artistic twist I use makes these objects into beautiful plant holders and decorations. There is not much reason to pay $20 for a plant holder when you could recycle items from a thrift store, yard sale, or from your own home remodel. A can of spray paint in a striking color can also help improve the look of a recycled plant holder. Now I challenge you to try this and feel free to take inspiration from a few of my items.

This chair was found pre-painted at a thrift store. Someone had a some kinda idea when they painted it and didn't know what to do with it. A plant stand in the center hold up the heavy clay pot holding a two year old white Phlox. Phlox grows great in large pot and come back early, also smells very sweet. Spring has only been around for one week and it has already grown so big.


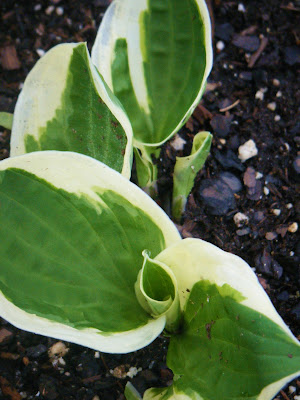
This is a light yellow sink that came out of the bathroom. The house is old so what came out during the remodel was also old. Sinks are perfect since the come with their own drainage hole and can be moved out of intense heat. I planted a small Hosta in it last year and it has come up again. The Hosta began growing about ten days ago.


I love the variegated stripes on this Hosta. Right now it is in a good bit of sun, so later in the Summer I will be able to move it into the shade so it doesn't burn. It will be so pretty.


Here is the toilet I mentioned earlier, this time you can see the whole deal. A Mustang Daylily is growing in the bowl and when frost passes I will put impatiens in the water reservoir. The toilet has light mulching at the bottom with red cedar chips. I poured a bag of pebbles into the bowl last year to provide good drainage and to use less soil. 

The Daylily is compact enough to not smother in the bowl and can grow into the pebbles. The toilet does not get water-logged, no plunger required, because on the pebbles. I have never seen the Daylily bloom; but, that is because I left it in its tiny pot until it died down, then I moved the bulb to the bowl.


This headboard came off of my old twin size bed I grew out of a few years back, it was 5 feet long and I am over 5 feet tall so I got a lot of head bumps. We took the headboard and base board off, both identical, and placed one in front of the Gladiolus and Four O'clock bush(hasn't came up yet.) I used the metal mesh part that hold the mattress and the board together as a trellis. I will show more about the trellis that will support my peas, which have started to emerge today.


The board is simple; but, it will provide a sturdy brace for heavy blooms and still be a pretty background for the blooms that are pink/white and peach/rose.

~~~
Visit Homestead Revival to see what the Homestead Barn Hop has to offer. So far the best posts are featured at the Barn Hop. Have fun dose-doing around the blogs.

Saturday, March 26, 2011

When It Rains, It Pours Laziness

Since thunder and lightning rolled in about four this morning, I knew there was going to be no fun today. So I have been watching M*A*S*H* (my favorite old show) and taking updated pictures of what has been popping up inside. Here is a small sample of what has turned my house into a greenhouse. I hope these are enough to tide you over until I can find some more interesting stuff.
These are the green tomatoes planted earlier this month. They are approximately three inches tall, how they grow up so fast. The Missouri Pink Love Apples are doing as well also. I have set these outside on sunny days to slowly adjust them to the outside elements.


The crinkle leaves are called true leaves. They resemble miniature versions of the full grown leaves.


My fast growing Brussels Sprouts are doing fine also, nearly everyone has grown (a total of 43 plants, give or take one.).


Don't they look like they want a hug. Owww! How cute it is with its little dicot arms wide open and true leaf head.


I have not mentioned every type of seed I have planted, because they will be mentioned in upcoming posts. Can you guess what these new babies are?


How about now?


No? Well they are Basil seedlings. I was suprised by these little buggers. I had them covered in plastic wrap and the wrap was fogged. I began to notice the wrap was not as tighly wound as before and low-and-behold they had sprouted, and kept sprouting.
The seeds were very small and by the time I got to the right side of the flat I just sprinkled the seeds anywhere they fell. Some of the cells towards the right are overcrowded; but, hopefully they will not smother each other out before they can be transplanted.


Here is the bottom of our driveway, what a sloppy mess.

In the foreground you can see a pond of red water. It is not a pond, it is a hole dug at the lowest part of the valley that is over twenty-five feet deep in areas and even deeper in others. When it rains the water simple flows down the field into the hole, where it stops the water from flooding the driveway that goes beside it. Where my garden is situated (you can see a corner of it to the right of the right turn) is also level with the hole and gets flooded out during heavy rainfall. Last Summer part of my corn rows were bent, like candycanes, to the right and not as straight and pretty as I had planned. The water had flowed into the irigation ditch dug down the center of the garden and pulled alot of seeds in that direction, causing the cooky shped rows.

I hope those of you with gardens do not suffer as terribly from these bouts of Spring storms. Luckily the garden is only growing weeds and will be tilled soon. Happy Spring showers and good luck finding rainbows.

~~~
I have once again entered a post of mine into two blog hops. I am trying to be known and so far I have had a great experience. Thank you for stopping by and thank you even more for your smile inducing ramblings. This post has been enterd in the Relax & Surf Sunday over at The Life of Rylie and Bryce Too and The Farm House Blog Hop.
Relax & Surf Sunday

Thursday, March 24, 2011

Stormy Evenings of Spring

We have recieved a few showers on and off; but, the wind is what really got us. It gets real warm in the day, aroud 78 or higher, and the cool of evenings cause some pretty mighty storms. Before the first set of rain clouds came in I took some pictures of a few more colorful pieces around our flower garden.

I found a few large patches of Birdsfoot Violets in the woods.


I replanted purple and white Birdsfoot Violet into a few clay pot to add color to some pretty barren spots.


They are perfect plants for cold nights when other plants would crumple and freeze to-death.


The wind knowed alot of pine cones down to the ground. I wanted to take a picture of all the Dandelion seed heads; but, the wind took those away to.


Finaly the clouds began to pour and what did I do?


I let the clouds water my tomatoes for me, they are strong enough to withstand a little rain and wind.

~~~
This post was added to a blog hop, kinda like a sock hop; but, the poodle skirts have goats and chickens on them. Dandelions House Home Arts was today's host.

~~~

I have also posted on the Farm Friend Friday at Verde Farm. Hop over there now to view beautiful and funny pictures of the interesting creatures they raise.

Friday, March 18, 2011

A Southern Spring With a Spalsh of Color

The Bradford Pears are already in white bloom and developing leaves in sunnier locations. Forsythia's are burning bright yellow. Weeping Willows show sashes of moss green. Violets shine their faces with splashes of purple. Color is everywhere, color is God's way of telling us that life is coming back.

Even rust from a chicken plant holder looks beautiful.


For the past couple weeks the Daffodils have been popping up like the grass is. In the mountains we mainly have an old strain of yellow Daffodils; but, I planted these to mix the landscape up.


A Daylily planted in a toilet, yes a toilet. The bowl make up the lower planter and the water reservoir makes up the upper planter. It may seem trashy; but, it makes a fun talking piece.


I purchased this wind chime last Spring at an art festival. Glass chimes are prettier and lovely sounding.

The glass makes a beautiful chime, the color is an added bonus.


I hope Spring comes to all of you soon, if it hasn't already.
~
Update: I have joined the Homestead Barn Hop! if you love reading new blogs(like me) hop on over to the barn hop by using the button below.

Fast Sprouters

I have never seen seeds germinate so fast, these plants came up only three days after planting. What are they?....

....Brussels Sprouts! They look very much like four leave clovers. There are over twenty plants. It might seem odd; but, I love Brussels. I steam mine and add a little salt and Amish butter.


I have searched allover to find Brussels Sprouts being grown, they do not seem to be very popular. Hopefully I will be able to get these in the ground soon.

Saturday, March 12, 2011

Update

I began to notice tomatoes sprouting, it has only been a week. There are still no peppers, but it is okay since peppers are slow anyway. It is important to keep the soil warm and moist, this will simulate an indoor spring. Yesterday I planted Brussels Sprouts and will plant Echinacea today.
~
We did butcher one of the hogs, I wasn't present because I had courses that day. I will try and be present at the next one and show how we put up the meat. Most of it is being salt cured (half is being sugar cured and the other half is plain salt cured.) We made sausage and pattied it yesterday, we freeze it along with the tenderloin. I am just trying to tell you that you should try and produce your own meat and not rely on antibiotic and steroid infused meat. Even if you can't raise your own livestock, just buy local and ask questions about what your buying.
~
Lastly, I know a few have started following and I just want to know what do you want to see on here, what interests y'all? Just email or leave a comment.
~
Have a beautiful and warm weekend.

Friday, March 4, 2011

How to Plant Tomato & Pepper Seeds

Like I wrote earlier, I have began planting the first of this season's seeds. Today I planted Missouri Pink Love Apple, Evergreen Emerald, and Campbell's tomatoes. I also planted Red Cheese and Mix Bell peppers. To start with soil, I use professional grade Pro-Mix, purchased from a local greenhouse. This is not a seed starting soil, but I believe if the local nurseries can start seeds with this so can I. Pro-Mix is soil-less and made up of sphagnum moss, bark, vermiculite, perilite and few other ingredients that makes this a lightweight dirt-less soil. Make sure to buy sterile soil and non-fertilizer added soil, this prevents disease and other plant complication that come from over fertilizing and contamination. Starting with good soil is the best foundation to start your own plants.
To sterilize containers wash with 10 parts hot water and 1 part bleach.
Pour dry soil into the sterilized cells or whatever container preferred, do not pack tightly. Gently tap down the soil evenly with your fingers. Remove any obtrusive pieces of bark or perilite, like the piece of perilite above.

Using the seedling irirgator water the soil until the soil is saturated, but not dripping or pooling water.


I poured the seeds out on a large index card and determined how many seeds I had. (I may be a bit OCD for lining up the seeds, but they look great lined up like that.) Make sure to make labels, above labels are made for specifically for plant labeling. You can make labels out of Popsicle sticks or pieces of plastic. Make sure to write in permanent marker since water and sun can deteriorate other markers.
Store any seeds that you don't plant in dry containers.


Place the seeds individually into their own area, as centralized as possible to provide enough room for roots to stabilize the plant. Above is a pepper seed, when planting small seeds check to see if the seed is stuck to another. Separate any stuck seeds and plant.


Place a label on each row to identify the seedlings. Tomato and pepper seedlings look a bit different from one another. I alternated the tomato and peppers, just in case I loose any of the labels.


Cover the seeds gently with loose dry soil. Gently cover each seeds, do not move the soil to much because you can carry seeds from one place to another. Re-water the finished layer to settle the soil and to begin germination.


Place a layer of plastic wrap over the seeds to create a temporary hothouse. Set the tray or whatever you planted in on top of the fridge. Use your fridge as a heat mat and remember to check daily for moisture level. If the soil turns light brown then the seeds need water. When plants begin to emerge, remove the plastic wrap and set in a south facing window.
Watch for more plantings and tutorials on gardening soon. Have fun planting and God bless your gardens to be bountiful.

Make Your Own Seedling Irrigator

Most gardeners who start their own transplants from seeds, recommend watering from the bottom of the plant; to do this you would fill the tray, that the seed container is in, with water. If your like me you don't set every single container in sealed trays. Today I used a a 128 cell seed tray that I got saved from my time working in a greenhouse.
Nurseries start their plants from seed and some plants are pre-grown and purchased from a corporate greenhouse*. I have a few of the trays that came from the corporate greenhouse and I love them. The cells are approximately the size of a quarter and are perfect for slow growing plants like tomatoes and peppers.
Now back to watering. To make your own seedling irrigator you will need:
  • A thin plastic bottle(the soft sides make it easy to squeeze)
  • Same screw-top from bottle
  • Marker
  • One thumbtack
These bottles(Great Value brand) are perfect for this project. I love drinking a certain variety of water that comes from a town nearby and Great Value bottles it; I have so many of these bottles that and they are great for different water irrigation projects (more in the Spring.) What a great way to recycle and help get plants off to a great start.

Mark one or more dots in a circular pattern with a marker, to imitate a miniature sprinkler head.

Pierce the dots with a sharp thumbtack.

Fill the bottle up with water and twist the top back on tightly. If you add anything other than water, such as diluted fertilizer, make sure to write some symbol or description of what is inside the bottle; so that you don't cross contaminate chemicals with anything that does not need fertilizer or whatever else you have in the bottle.

Now test your seedling irrigator: squeeze the water out or prop it upside down against the soil and let it become a drip irrigator. Above is a tomato plant that was first watered with one of my homemade waterer's, notice how sturdy it looks.

When it is empty just take off the top and force some air into the bottle, making sure to pop out any major dents in the plastic.

Keep one of these for whenever you plant seeds and you can't go wrong.
*Sometime next week I will be visiting a corporate greenhouse that is massive. I will take pictures and show you where flowers, that you buy from the nursery or co-op, realy start at.